Why Your Bread Crust Never Gets That Perfect Crunch

Most home bakers believe that a heavy-duty, expensive stand mixer or a high-end convection oven is the secret to a bakery-quality loaf. They are wrong. The difference between a bread that feels like a sponge and a loaf with a shattering, golden-brown crust isn't the machine you use—it's the way you manage moisture and thermal energy during the first twenty minutes of baking. A lackluster crust usually stems from a lack of steam or a failure to manage the oven's internal environment, leaving the exterior to dry out prematurely before the bread has finished expanding.
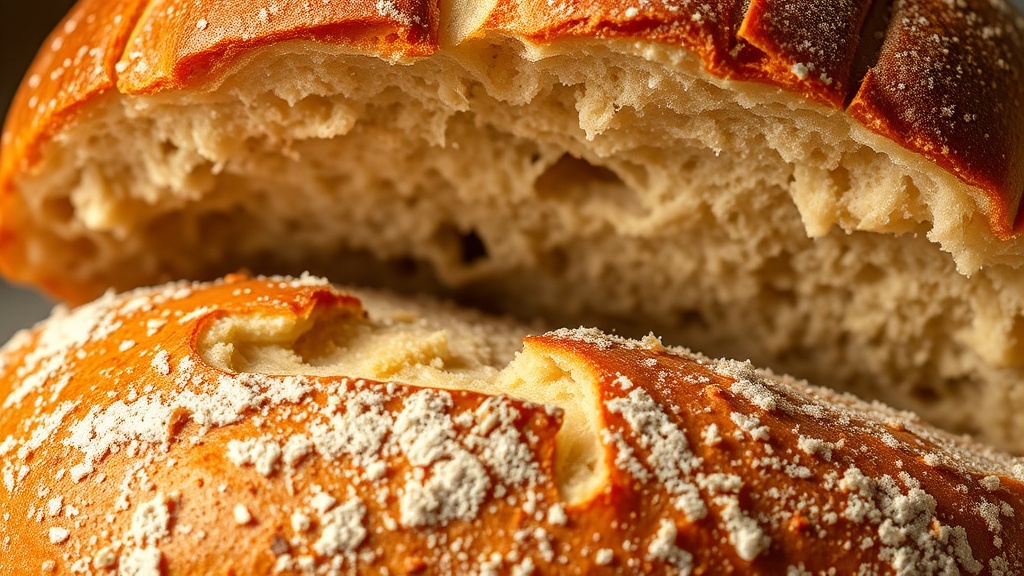
To get that professional finish, you have to understand that baking is a game of physics. When the dough hits a hot surface, the water inside the loaf begins to turn into steam. This steam is what keeps the surface of the dough flexible, allowing the gases inside to expand the loaf (the "oven spring") without the crust setting too early. If you skip the steam, the crust hardens almost immediately, resulting in a dense, heavy loaf with a dull finish. We're looking for that specific, audible crunch—the kind that breaks when you slice into it.
Does Bread Need Steam to Develop a Crust?
The short answer is yes. In professional bakeries, steam injection systems are standard equipment. They blast a cloud of moisture into the oven immediately after the loaves are loaded. For the home cook, you have to replicate this manually. There are three main ways to do this: using a Dutch oven, a baking stone with a water tray, or a specialized steam tray. The Dutch oven method is arguably the most reliable because the heavy lid traps the moisture escaping from the dough itself, creating a miniature, high-humidity microclimate.
If you aren't using a Dutch oven, you might try the "water tray" method. This involves placing an empty cast iron skillet on the bottom rack of your oven and pouring boiling water into it as soon as you slide your bread in. This creates a sudden burst of steam that helps the crust stay supple. However, be careful—splashing water into a hot oven is a quick way to burn yourself or damage your oven's heating elements. For more technical details on the chemistry of bread-making, the King Arthur Baking resources offer deep dives into hydration levels and fermentation.
What Temperature Should I Bake Bread At?
Temperature control is where many people lose the battle. If your oven is too cool, the bread will never reach the necessary internal temperature to fully set the crumb, and the crust will be soft and gummy. If it's too hot, you'll get a burnt exterior with a raw, doughy center. A standard starting point for sourdough or artisan white loaves is a high initial heat—around 450°F (230°C)—followed by a reduction in temperature once the lid is removed or the steam is dissipated.
The goal is to use that initial heat to drive the steam and the expansion, and then lower it to finish the bake and dry out the crust. This two-step process ensures the interior is cooked through while the exterior develops that deep, caramelized color. You can check the internal temperature of your loaf with a digital thermometer; for most lean doughs, you want to see an internal reading of at least 205-210°F. If you're curious about the science of heat transfer, the Exploratorium Science of Cooking website explains how conductive and convective heat interact with food surfaces.
How Long Should I Bake Bread to Get a Crisp Crust?
There is no single magic number, but the rhythm of the bake is predictable. Usually, the first 20 to 25 minutes are the "steam phase," where the lid is on or the moisture is high. The remaining 15 to 25 minutes are the "drying phase," where the lid comes off and the oven's dry heat works to crisp up the exterior. This second stage is where the Maillard reaction and caramelization really take hold, creating those beautiful dark brown hues and complex flavors.
One mistake I see often is pulling the bread out of the oven too early. If the loaf sounds hollow when you tap the bottom, it's a good sign, but don't rely on sound alone. If the crust looks pale, it needs more time in the drying phase. A slightly darker, more deeply colored crust is often more resilient and stays crunchy longer than a pale, golden one. The color is a visual cue that the sugars in the flour have properly caramelized.
| Baking Stage | Goal | Environment |
|---|---|---|
| Initial Bake | Oven Spring & Expansion | High Heat + High Steam |
| Finishing Bake | Color & Texture Development | Moderate Heat + Low Humidity |
Finally, let's talk about the most difficult part: the cooling. Once the bread comes out of the oven, it is not actually "done." The cooling process is a continuation of the cooking. As the bread cools, moisture moves from the center to the crust. If you cut into a hot loaf, you'll release that steam immediately, which can lead to a gummy interior and a soggy crust. Let your bread rest on a wire rack for at least one hour. This allows the structure to set and the crust to maintain its integrity. Patience is your best tool in the kitchen.